Shadcn UI + Stripe: Building Payment Pages That Convert
Complete Stripe integration guide using Shadcn UI payment form blocks. Covers Stripe Elements, PaymentIntent flow, webhook handling, subscription billing, 3D Secure, and checkout UX patterns for Next.js e-commerce apps.
SERP Blocks Team
Product
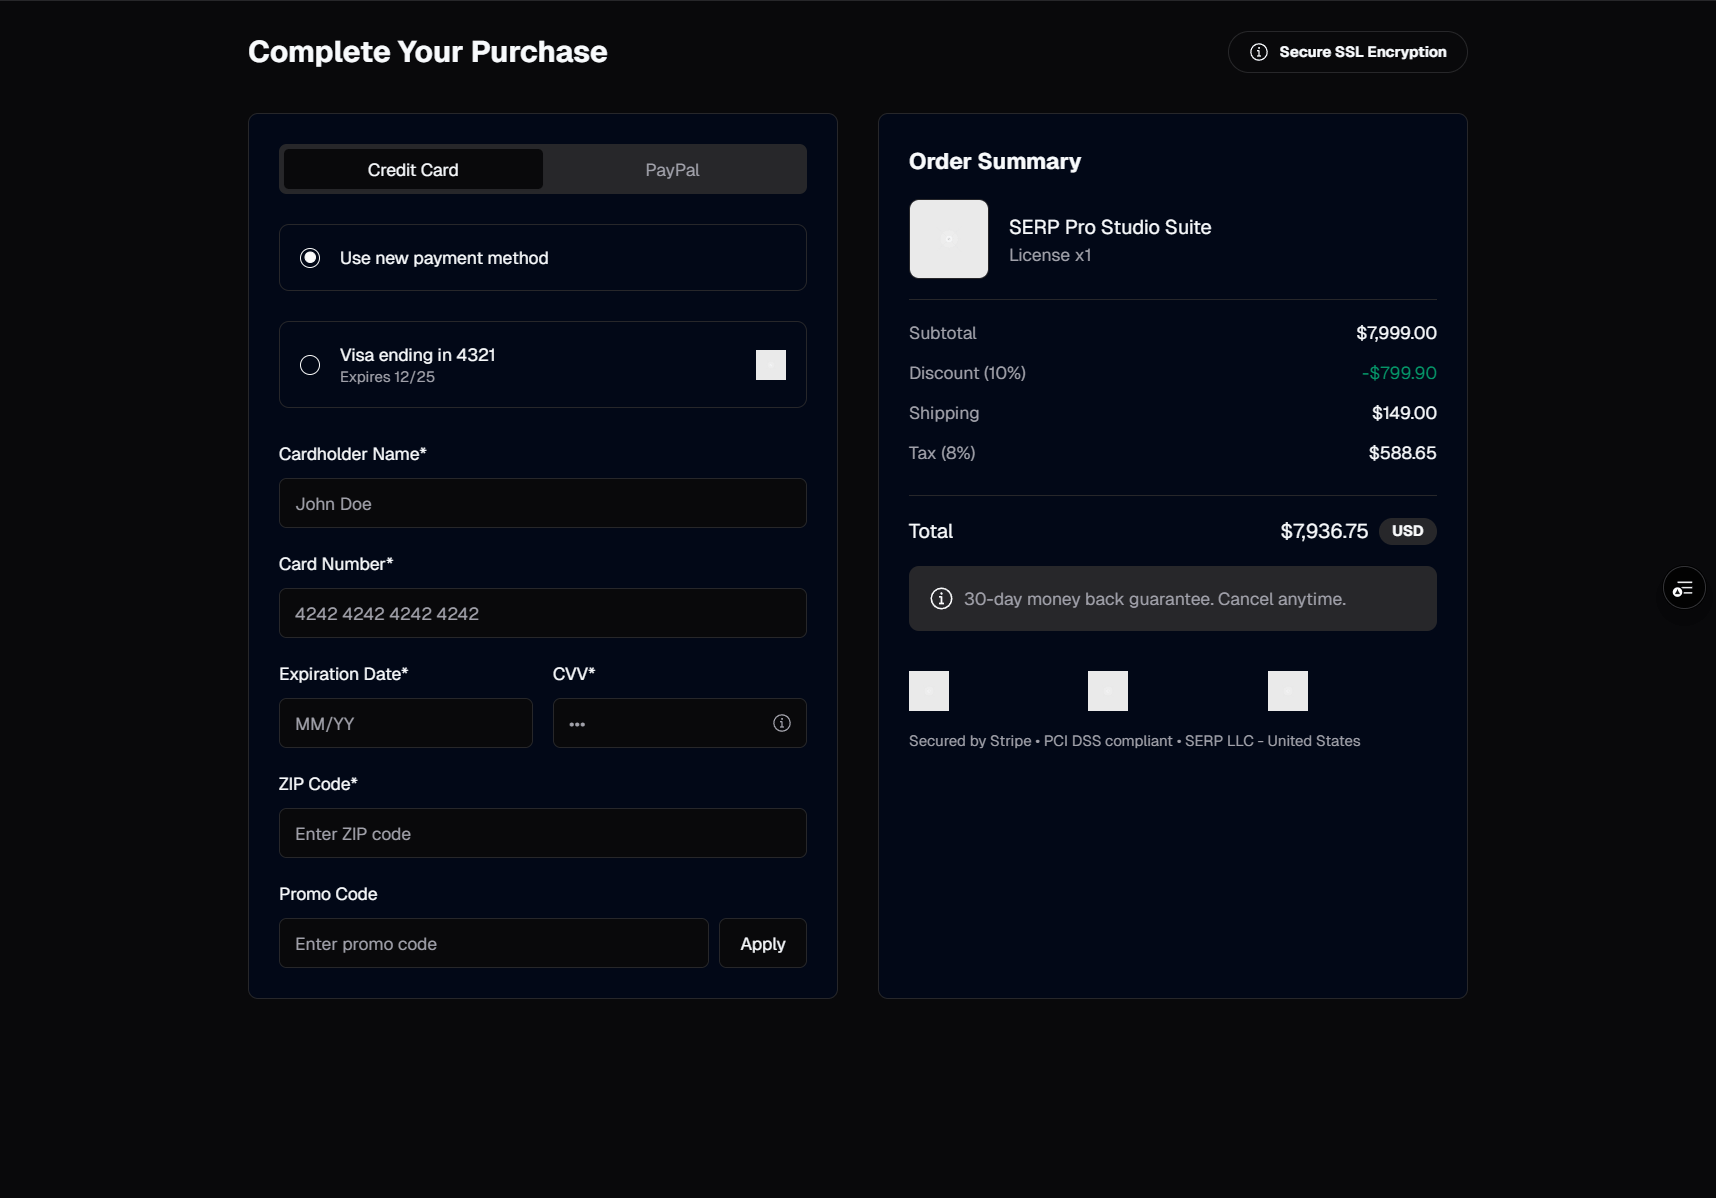
Stripe processes hundreds of billions of dollars in transactions every year, and it has become the default payment infrastructure for startups, SaaS companies, and e-commerce platforms building on React and Next.js. The API is well-documented. The developer experience is strong. But the frontend — the actual payment page where customers hand over their credit card — is where most teams lose time, lose conversions, and introduce security risks they do not fully understand.
A payment page is not just a form with four inputs. It is a trust boundary. Customers evaluate your payment page in the first two seconds. They look for visual signals — a clean layout, a padded card input, familiar payment method icons, a visible lock indicator. Baymard Institute research consistently shows that 17 to 19 percent of cart abandonments happen because the customer did not trust the site with their card information. That trust is built entirely through frontend design.
Building a Stripe-integrated payment page from scratch means handling Stripe Elements mounting, PaymentIntent creation on the server, real-time form validation, error states for declined cards, loading states during processing, 3D Secure authentication flows, webhook verification for fulfillment, and a responsive layout that works on mobile where more than half of e-commerce traffic originates. That is a week of focused development.
SERP Blocks includes 15 payment form blocks built with Shadcn UI and Tailwind CSS. Combined with 11 shopping cart blocks, 10 order confirmation blocks, and 21 pricing blocks, they cover the entire payment surface area of a production application. This guide walks through integrating Stripe with those blocks step by step.
Setting Up Stripe in a Next.js Project
Start with the Stripe packages. You need the server-side SDK for creating PaymentIntents and managing subscriptions, plus the React wrapper for Stripe Elements on the frontend.
npm install stripe @stripe/stripe-js @stripe/react-stripe-jsCreate a server-side Stripe client. In Next.js App Router, this lives in a utility file that only runs on the server:
// lib/stripe.ts
import Stripe from "stripe";

export const stripe = new Stripe(process.env.STRIPE_SECRET_KEY!, {
  apiVersion: "2025-12-18.acacia",
  typescript: true,
});
On the client side, initialize the Stripe promise once and share it through a provider. This is important — creating the Stripe instance is expensive, and you want to do it exactly once:
// lib/stripe-client.ts
import { loadStripe } from "@stripe/stripe-js";

export const stripePromise = loadStripe(
  process.env.NEXT_PUBLIC_STRIPE_PUBLISHABLE_KEY!
);
Wrap your checkout page in the Stripe Elements provider. The Elements component makes the Stripe instance and Elements context available to every child component, which means your payment form block can access useStripe() and useElements() without any additional prop drilling:
import { Elements } from "@stripe/react-stripe-js";
import { stripePromise } from "@/lib/stripe-client";

export default function CheckoutPage() {
  return (
    <Elements
      stripe={stripePromise}
      options={{
        appearance: {
          theme: "stripe",
          variables: {
            colorPrimary: "hsl(var(--primary))",
            borderRadius: "var(--radius)",
          },
        },
      }}
    >
      <PaymentForm />
    </Elements>
  );
}
The appearance option is where Stripe Elements and Shadcn UI connect. By mapping Stripe's colorPrimary to your Shadcn --primary CSS variable and matching the borderRadius, the Stripe-hosted card input visually blends with the rest of your form. Customers see one cohesive design rather than an embedded widget that looks like it belongs to a different site.
The PaymentIntent Flow
Stripe's recommended payment flow uses PaymentIntents. The flow works like this:
Your server creates a PaymentIntent with the order amount and currency
The server returns the
client_secretto the frontendThe frontend uses
stripe.confirmPayment()with the client secret and card detailsStripe processes the payment and returns a result
Your server receives a webhook confirming the payment succeeded
You fulfill the order based on the webhook, not the frontend result
The server action to create a PaymentIntent:
// app/actions/payment.ts
"use server";

import { stripe } from "@/lib/stripe";

export async function createPaymentIntent(amount: number) {
  const paymentIntent = await stripe.paymentIntents.create({
    amount: Math.round(amount * 100), // Stripe uses cents
    currency: "usd",
    automatic_payment_methods: { enabled: true },
  });

  return { clientSecret: paymentIntent.client_secret };
}
Using automatic_payment_methods is important. It tells Stripe to enable every payment method you have configured in your Stripe Dashboard — credit cards, Apple Pay, Google Pay, bank transfers, buy-now-pay-later options — without you specifying each one in code. When Stripe adds new payment methods, your checkout picks them up automatically.
Integrating Stripe Elements with Payment Form Blocks
The payment form blocks in SERP Blocks handle the visual layout — form sections, field grouping, order summary sidebar, trust badges, and responsive behavior. Your job is to connect the Stripe-specific logic.
Replace the static card number, expiration, and CVC inputs in the block with Stripe's PaymentElement. The PaymentElement is a single component that renders all enabled payment methods — cards, wallets, bank redirects — and handles the input UI, validation, and formatting internally. This approach is both simpler and more secure than using individual CardNumberElement, CardExpiryElement, and CardCvcElement components:
import { PaymentElement, useStripe, useElements } from "@stripe/react-stripe-js";

function PaymentForm() {
  const stripe = useStripe();
  const elements = useElements();
  const [isProcessing, setIsProcessing] = useState(false);
  const [error, setError] = useState<string | null>(null);

  const handleSubmit = async (e: React.FormEvent) => {
    e.preventDefault();
    if (!stripe || !elements) return;

    setIsProcessing(true);
    setError(null);

    const { error: submitError } = await stripe.confirmPayment({
      elements,
      confirmParams: {
        return_url: `${window.location.origin}/order-confirmation`,
      },
    });

    if (submitError) {
      setError(submitError.message ?? "Payment failed. Please try again.");
      setIsProcessing(false);
    }
  };

  return (
    <form onSubmit={handleSubmit}>
      <PaymentElement />
      <Button
        type="submit"
        disabled={!stripe || isProcessing}
        className="w-full mt-6"
      >
        {isProcessing ? "Processing..." : "Pay Now"}
      </Button>
      {error && (
        <p className="text-sm text-destructive mt-2">{error}</p>
      )}
    </form>
  );
}
The return_url matters. After a successful payment — or after a 3D Secure authentication step — Stripe redirects the customer to this URL with a payment_intent query parameter. Your order confirmation blocks handle this landing page, showing the receipt, order number, estimated delivery, and next steps.
Payment UX That Increases Conversions
The difference between a payment page that converts at 2 percent and one that converts at 4 percent is almost entirely about UX details. The payment form blocks in SERP Blocks encode these patterns, but understanding why they work helps you make informed customization decisions.
Order Summary Visibility
Every payment form block includes an order summary section — either as a sidebar on desktop or a collapsible panel on mobile. This is not decorative. Customers need to verify what they are paying for at the exact moment they enter their card. If they have to navigate back to the cart to check, a significant percentage will not return.
The summary should include line items with names and quantities, individual prices, subtotal, shipping cost (or "Free" — never omit it), tax, and the total amount in a larger font weight. The total must match the amount in the PaymentIntent exactly, down to the cent. Any discrepancy triggers fraud suspicion.
Trust Signals
Trust signals on a payment form include visual security cues that reassure customers their card data is safe. The payment form blocks include designated areas for:
SSL/security badge placement — A lock icon with "Secure checkout" text near the card input. Customers actively look for this.
Payment method icons — Visa, Mastercard, Amex, and Apple Pay/Google Pay logos. Showing accepted methods before the customer starts typing reduces uncertainty.
Money-back guarantee text — A brief refund policy statement near the submit button. This reduces perceived risk at the moment of commitment.
Company contact information — A footer with your support email or phone number. Knowing they can reach someone if something goes wrong makes customers more comfortable completing the purchase.
These elements are part of the block layout. You swap in your own copy and badge images without modifying the component structure.
Error Handling
Payment errors need to be specific and actionable. "Payment failed" tells the customer nothing. The Stripe error object returns error codes that you should map to human-readable messages:
card_declined— "Your card was declined. Please try a different card or contact your bank."insufficient_funds— "Your card has insufficient funds. Please try a different payment method."expired_card— "Your card has expired. Please use a different card."incorrect_cvc— "The security code is incorrect. Please check and try again."processing_error— "An error occurred while processing your card. Please try again in a moment."
Display these errors inline, directly below the card input, using the text-destructive Shadcn color token. Errors should appear immediately and disappear when the customer starts editing.
Loading States
The gap between clicking "Pay Now" and receiving a response from Stripe takes 2 to 5 seconds — longer if 3D Secure is involved. During this time, the submit button must be disabled and show a loading indicator. The payment form blocks use a spinner icon inside the button with text that changes from "Pay $49.00" to "Processing..." to prevent double-submissions and reassure the customer that their payment is being handled.
Never redirect during processing. The customer should see the same page with a clear processing state until Stripe returns a result.
Handling 3D Secure Authentication
3D Secure (3DS) is a fraud prevention protocol required by many banks, especially in Europe under PSD2 regulations. When a card requires 3DS, Stripe shows an authentication modal — a bank-branded popup where the customer confirms the payment with a code or biometric.
If you use stripe.confirmPayment() with PaymentElement, 3D Secure handling is automatic. Stripe detects when a card requires authentication, displays the modal, waits for the customer to complete it, and then continues the payment flow. No additional frontend code is needed.
The important UX consideration is what happens around the modal. Your payment form should not change state while the modal is open. The button should remain in its "Processing..." state, and the form should stay visible behind the modal overlay. When the customer completes authentication, the confirmPayment promise resolves and your normal success/error handling takes over.
For cards that do not require 3DS, the flow is transparent — confirmPayment resolves directly without any modal.
Webhook Handling for Order Fulfillment
Never fulfill orders based on the frontend response from stripe.confirmPayment(). The frontend response confirms that the payment was submitted, but the definitive confirmation comes through Stripe webhooks. A customer could close their browser after payment but before your frontend processes the success response. Webhooks ensure you never miss a completed payment.
Set up a webhook endpoint in your Next.js API routes:
// app/api/webhooks/stripe/route.ts
import { stripe } from "@/lib/stripe";
import { headers } from "next/headers";

export async function POST(request: Request) {
  const body = await request.text();
  const headersList = await headers();
  const signature = headersList.get("stripe-signature")!;

  let event;
  try {
    event = stripe.webhooks.constructEvent(
      body,
      signature,
      process.env.STRIPE_WEBHOOK_SECRET!
    );
  } catch (err) {
    return new Response("Webhook signature verification failed", {
      status: 400,
    });
  }

  switch (event.type) {
    case "payment_intent.succeeded":
      const paymentIntent = event.data.object;
      await fulfillOrder(paymentIntent);
      break;
    case "payment_intent.payment_failed":
      const failedPayment = event.data.object;
      await handleFailedPayment(failedPayment);
      break;
  }

  return new Response("OK", { status: 200 });
}
Signature verification is mandatory. Without it, anyone could send fake webhook events to your endpoint and trigger order fulfillment without payment. The STRIPE_WEBHOOK_SECRET comes from your Stripe Dashboard webhook configuration.
Subscription Billing with Stripe
For SaaS applications, subscriptions replace one-time payments. The flow is different — instead of creating a PaymentIntent, you create a Stripe Checkout Session or use the Subscription API directly.
The 21 pricing blocks in SERP Blocks are designed for subscription presentation. They include monthly/annual toggle switches, feature comparison tables, highlighted "most popular" tiers, and clear CTAs for each plan. Wire the plan selection to a server action that creates a Stripe Checkout Session:
"use server";

import { stripe } from "@/lib/stripe";

export async function createCheckoutSession(priceId: string) {
  const session = await stripe.checkout.sessions.create({
    mode: "subscription",
    payment_method_types: ["card"],
    line_items: [{ price: priceId, quantity: 1 }],
    success_url: `${process.env.NEXT_PUBLIC_APP_URL}/dashboard?session_id={CHECKOUT_SESSION_ID}`,
    cancel_url: `${process.env.NEXT_PUBLIC_APP_URL}/pricing`,
  });

  return { url: session.url };
}
Stripe Checkout Sessions handle the entire payment UI on Stripe's hosted page. This is the fastest path to subscription billing because you skip building the payment form entirely — Stripe handles card collection, 3DS, payment method storage, and PCI compliance. Your pricing blocks handle plan selection and your order confirmation blocks handle the post-payment landing page.
For teams that want to keep the payment UI on their own domain, use the PaymentElement approach described above but create a Subscription instead of a PaymentIntent on the server. This requires more frontend work but gives you complete control over the checkout experience.
Managing Subscription State
After a customer subscribes, you need to track their subscription status. Use webhooks to listen for subscription lifecycle events:
customer.subscription.created— Activate the customer's accountcustomer.subscription.updated— Handle plan upgrades and downgradescustomer.subscription.deleted— Revoke access when the subscription endsinvoice.payment_failed— Notify the customer and show a dunning banner
The dashboard blocks (20 designs) include account status indicators that you can wire to subscription data — active/past due/canceled badges, usage meters, and billing cycle displays.
Building the Complete Purchase Flow
A Stripe integration does not end at the payment form. The purchase experience spans multiple pages, and SERP Blocks covers each one:
Before Payment:
Shopping cart blocks (11 designs) — Item list, quantity controls, promo code inputs, order total calculations. The cart is where customers make their final commitment decision.
Pricing blocks (21 designs) — For subscription products, the pricing page is the entry point to the payment flow. Plan comparison, feature lists, annual/monthly toggles.
During Payment:
Payment form blocks (15 designs) — The Stripe-integrated checkout form. Single-page and multi-step layouts with order summary sidebars.
After Payment:
Order confirmation blocks (10 designs) — Success states with order numbers, estimated delivery, receipt details, and upsell opportunities.
This four-stage flow means a customer moves from browsing to purchase completion on pages that share consistent design language, typography, spacing, and interaction patterns. The visual continuity is built into the blocks because they all use the same Shadcn UI component primitives and Tailwind CSS configuration.
Testing Stripe Integration
Stripe provides test card numbers for every scenario you need to verify:
4242 4242 4242 4242— Successful payment4000 0000 0000 3220— 3D Secure required4000 0000 0000 9995— Declined (insufficient funds)4000 0000 0000 0069— Declined (expired card)4000 0027 6000 3184— 3D Secure required, then declined
Use these in Stripe's test mode to verify every error state, loading state, and success state in your payment form before going live. Test on mobile devices — payment forms that look perfect on desktop often have spacing or touch target issues on small screens.
Set up the Stripe CLI for local webhook testing:
stripe listen --forward-to localhost:3000/api/webhooks/stripeThis forwards live test webhooks to your local development server, so you can verify that your fulfillment logic fires correctly after a successful payment.
Security Considerations
PCI compliance is the legal requirement for handling credit card data. By using Stripe Elements — where card numbers are entered into Stripe-hosted iframes, never touching your server — you stay in the simplest PCI compliance category (SAQ-A). Your server never sees raw card numbers.
Additional security practices:
Always verify webhook signatures. Without verification, your fulfillment endpoint is an open door.
Use HTTPS everywhere. Stripe Elements will not load on HTTP pages.
Never log PaymentIntent client secrets. They grant temporary access to confirm a payment.
Set idempotency keys on server-side API calls. This prevents duplicate charges from network retries.
Rate-limit your PaymentIntent creation endpoint. Without limits, an attacker could create millions of PaymentIntents and incur Stripe fees.
From Blocks to Production
The path from SERP Blocks to a live Stripe-integrated checkout is straightforward: pick payment form blocks that match your checkout pattern (single-page or multi-step), replace static card inputs with the Stripe PaymentElement, create a server action for PaymentIntent or Checkout Session creation, set up the webhook endpoint for fulfillment, and connect your order confirmation blocks as the success landing page.
SERP Blocks offers 60 free blocks to start building, with the full library of 1,200+ blocks across 55+ categories available through a one-time Pro purchase. The payment form, shopping cart, order confirmation, and pricing blocks covered in this guide are part of that Pro collection — designed to work together as a complete commerce UI layer on top of Stripe's payment infrastructure.